Ever gazed longingly at pictures of a perfectly glazed, glistening ham, only to feel a pang of dread at the thought of making one yourself? You’re not alone. Many home cooks believe that achieving a show-stopping honey glazed ham requires professional chef skills or hours of intricate kitchen work. The truth, however, is wonderfully different. Preparing a succulent, beautifully caramelized ham that tastes as incredible as it looks is surprisingly simple, requiring just a handful of pantry staples and a touch of patience.
This guide will demystify the process, transforming what seems like a daunting task into an enjoyable culinary adventure. Get ready to impress your family and friends with a main dish that’s not just delicious, but also incredibly easy to create, making it the ultimate stress-free centerpiece for any occasion.
Why a Honey Glazed Ham is Your Go-To Centerpiece
The allure of a honey glazed ham extends far beyond its stunning visual appeal. It’s a dish that masterfully balances sweet and savory, creating a flavor profile that’s universally loved and incredibly comforting. The combination of golden honey and aromatic spices bakes down into a sticky, caramelized crust that locks in moisture, ensuring every slice is tender, juicy, and bursting with flavor.
- Effortless Elegance: This ham inherently carries an air of festivity and sophistication, making it an ideal choice for holidays like Easter, Thanksgiving, or Christmas. Yet, its simplicity means it’s equally perfect for a grand Sunday dinner or a special family gathering.
- Crowd-Pleaser Guaranteed: The sweet and savory notes appeal to almost every palate, making it a reliable choice when you need to feed a diverse group. It’s the kind of dish that garners compliments and requests for the recipe!
- Budget-Friendly Alternative: Craving that famous honey-baked taste without the premium price tag or the holiday crowds? Making your own honey glazed ham at home offers a superior flavor experience for a fraction of the cost. Plus, you get the satisfaction of having crafted it yourself.
- Versatile Pairing: Ham truly "goes with everything." From classic mashed potatoes and roasted vegetables to fresh salads and warm dinner rolls, it complements a wide array of side dishes, simplifying your meal planning.
For more insights into creating the perfect holiday meal centerpiece, check out our related article: Holiday Centerpiece: Craft the Best Honey Glazed Ham Easily.
Gathering Your Simple Ingredients
The beauty of this recipe lies in its straightforward ingredient list. You likely have most of these items in your pantry already, proving that extraordinary flavor doesn’t require exotic components.
- The Ham: This recipe typically calls for one 5-pound ready-to-eat ham. A spiral-cut ham is highly recommended as it's already pre-sliced, making carving effortless and allowing the glaze to penetrate deep into the meat. If your ham is larger or smaller, remember to adjust your cooking time accordingly, typically 10-12 minutes per pound for a pre-cooked ham, or as directed on the packaging. While bone-in hams often boast more flavor, a boneless ham offers easier carving.
- Pure Honey: The star of our show! Opt for a good quality honey, as its flavor will shine through. Pro-tip: To prevent sticky messes, lightly spray your measuring cup with cooking spray before measuring the honey. It will slide out beautifully!
- Dark Corn Syrup: This ingredient is key to achieving that rich, deep caramelization and glossy finish. It adds depth of flavor and contributes to the glaze's luscious texture. If you don't have corn syrup, a combination of dark brown sugar and a touch of water or apple juice can be substituted, though the texture of the glaze may vary slightly.
- Unsalted Butter: A touch of butter adds richness and helps the glaze adhere to the ham, while also contributing to the ham's moisture content, ensuring it remains wonderfully juicy.
- Whole Cloves: These aromatic spices infuse the ham with a warm, slightly spicy-sweet fragrance that is synonymous with holiday hams. While whole cloves can be pressed directly into the ham (especially if it's not spiral-cut), they can also be simmered in the glaze mixture, or a pinch of ground cloves can be used if you prefer.
- Optional Flavor Enhancers:
- Dijon Mustard: A tablespoon or two of Dijon mustard adds a tangy counterpoint to the sweetness, creating a more complex and balanced glaze. If you don't have Dijon, regular yellow mustard can work in a pinch, though it will yield a milder flavor.
- Cayenne Pepper: For those who love a bit of heat, a 1/4 teaspoon of cayenne pepper in the glaze introduces a delightful sweet and spicy kick.
- Orange Zest/Juice: A bright, citrusy note can elevate the glaze even further.
Crafting and Applying Your Irresistible Honey Glaze
The glaze is where the magic truly happens, transforming a simple ham into a masterpiece. Our easy-to-make glaze comes together quickly and beautifully.
Step-by-Step Glaze Creation:
- Combine Ingredients: In a small saucepan, combine the honey, dark corn syrup, melted butter, and any optional additions like Dijon mustard or cayenne pepper. If using whole cloves in the glaze, add them now.
- Gentle Simmer: Heat the mixture over medium-low heat, stirring constantly, until all ingredients are well combined and the mixture is smooth and slightly warmed through. Do not bring to a rolling boil; you just want to meld the flavors. If using whole cloves, let them infuse for a few minutes, then remove them before applying the glaze.
- Prepare the Ham: Unwrap your ham and place it in a large roasting pan, preferably one with a rack to allow for even heating and glaze runoff collection. If your ham is not spiral-cut, you might want to score the surface in a diamond pattern before glazing to help the flavors penetrate. If using whole cloves, you can stud them into the ham at the intersections of the diamond scores for a classic look and infused flavor.
- First Glaze Application: Using a pastry brush, generously apply about a third of the prepared glaze over the entire surface of the ham, ensuring it gets into the crevices of a spiral-cut ham.
For more ideas on how to customize your glaze and make this dish truly your own, delve into Honey Glazed Ham: Affordable & Delicious, Plus Glaze Variations.
Baking Your Ham to Perfection
Achieving that tender, juicy interior and perfectly caramelized exterior is all about controlled heat and timely basting.
- Preheat Oven & Initial Bake: Preheat your oven to 300-325°F (150-160°C). This lower temperature ensures the ham heats through gently without drying out. Place the glazed ham, cut-side down (if applicable), in the roasting pan. Cover the ham loosely with aluminum foil to prevent it from drying out during the initial baking phase.
- Baking Time: Bake the ham for approximately 10-12 minutes per pound, or until an internal thermometer inserted into the thickest part of the ham (avoiding the bone) reads 130°F (54°C). Since your ham is ready-to-eat, you're primarily warming it through and setting the glaze.
- The Basting Process: About 30-45 minutes before the ham is done, remove the foil. Increase the oven temperature to 375-400°F (190-200°C). Generously brush another third of the glaze over the ham. Return it to the oven and continue baking, basting with the remaining glaze every 10-15 minutes, until the internal temperature reaches 140°F (60°C) and the glaze is beautifully caramelized and sticky. Keep a close eye on the ham during this final stage to prevent the glaze from burning. If it starts to brown too quickly, you can loosely tent it with foil again.
The key to success here is patience and consistent basting. The layers of glaze build up to create that coveted sticky, sweet, and slightly crispy crust.
Serving and Presentation Tips
The journey from oven to table is just as important as the cooking itself. Proper resting and thoughtful presentation elevate your honey glazed ham from a mere dish to a memorable culinary experience.
- The Crucial Rest: Once your ham reaches the desired internal temperature and the glaze is perfectly caramelized, remove it from the oven. Do not slice it immediately! Loosely tent the ham with foil and let it rest for at least 15-20 minutes (or even up to 30 minutes for larger hams). This resting period is vital: it allows the juices, which have migrated to the center during cooking, to redistribute throughout the meat. The result is an incredibly tender and juicy ham, every single bite.
- Effortless Slicing: If you used a spiral-cut ham, carving is a breeze. Simply follow the pre-cut lines. For a whole ham, slice against the grain, starting from the thinner end.
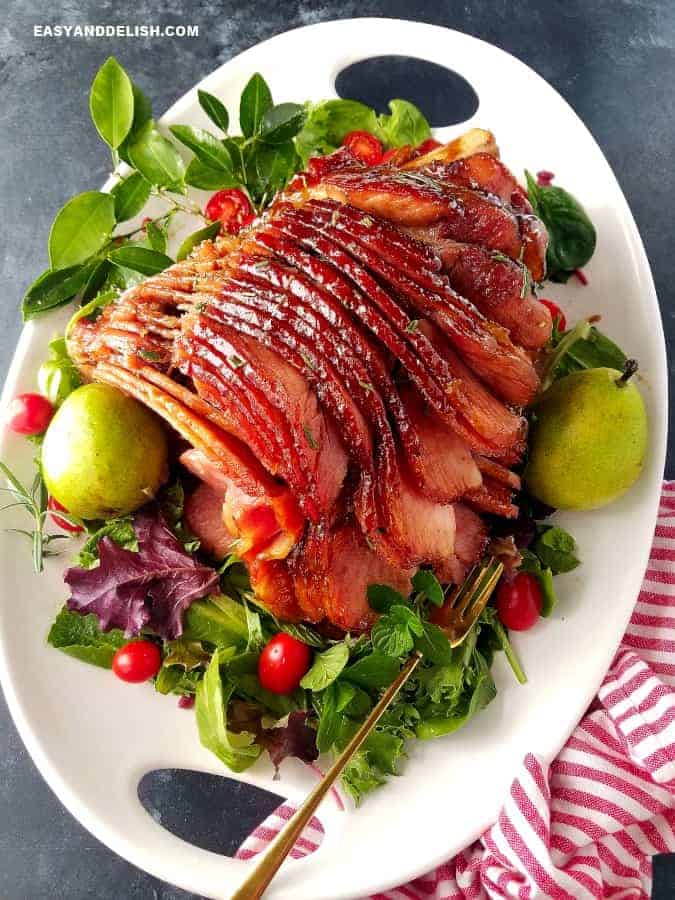
- Elegant Presentation: Transfer the rested ham to a large, beautiful serving platter. For a truly festive touch, garnish the platter with fresh herbs like rosemary sprigs or parsley. Bright, fresh elements like orange slices (even candied ones!), pineapple rings, or vibrant red cherries can add a pop of color and freshness, making your ham look even more irresistible.
- What to Serve With It: While the ham pairs with almost anything, classic accompaniments include creamy mashed potatoes, roasted asparagus, green bean casserole, sweet potato casserole, or a crisp garden salad. Don't forget some warm rolls to sop up any extra glaze!
Tips for Success & Delightful Variations
Mastering the honey glazed ham is easy, but a few extra tips and creative variations can make it truly unforgettable.
- Don't Rush the Rest: As mentioned, resting is non-negotiable for maximum juiciness. Plan this time into your meal preparation.
- Utilize Pan Drippings: The flavorful drippings at the bottom of your roasting pan can be used to make a simple gravy or served alongside the ham for extra moisture and flavor.
- Make Ahead Glaze: You can prepare the glaze up to 2-3 days in advance and store it in an airtight container in the refrigerator. Gently reheat it before applying to the ham.
- Sweet & Spicy Kick: Beyond cayenne pepper, consider a pinch of smoked paprika or even a dash of hot sauce (like sriracha) in your glaze for an adventurous twist.
- Citrus Infusion: Add the zest and a squeeze of fresh orange or pineapple juice to the glaze for a bright, tangy counterpoint to the sweetness. You can even arrange pineapple rings or orange slices on the ham during the final basting phase.
- Herbaceous Notes: Incorporate finely chopped fresh rosemary or thyme into your glaze for an aromatic boost that pairs beautifully with ham.
- Leftover Love: Don't let a single bite go to waste! Leftover ham is fantastic in sandwiches, quiches, omelets, ham and bean soup, or diced into pasta dishes.
Conclusion
You now possess the simple secrets to crafting a truly spectacular honey glazed ham. Gone are the days of culinary intimidation; in their place is the confidence to create a dish that is not only visually stunning but also incredibly delicious and surprisingly easy. With basic ingredients, a bit of patience, and these straightforward steps, you can confidently prepare a tender, juicy ham with that coveted sticky, sweet, and perfectly caramelized crust.
Whether it’s the star of your holiday table, a special family dinner, or simply a treat for yourself, this honey glazed ham promises to be a memorable and stress-free centerpiece. So, go ahead, grab your ham, whisk up that glaze, and get ready to serve a masterpiece that will have everyone asking for seconds!
